chilekat's latest photos on Grows on You, where garden ideas are shared.

Thursday, 12 March 2020

Homemade hand sanitiser

Using hand sanitiser during the current Coronavirus pandemic is sensible. However; the idiots panic buying bulk loads are not. They are utterly selfish; hoarding more than they will ever use, leaving others to go without which ultimately puts everybody at risk. Fortunately, these prats are not buying up the simple ingredients you need to make your own (because they are probably too lazy). 🙄


Anyhoo, now I’ve aired my views on that, let’s move onto something more constructive...

Here’s how to make your own hand sanitiser following a recipe confirmed by medical experts.


You will need:
https://drive.google.com/uc?export=view&id=1J-iDIwmTzJS2YQ13R0aEmBddqI9Hm5Rz

Aloe Vera gel (find it with the after sun products), pure alcohol, and essential oils if you wish to add a fragrance (though let’s face it, that’s not really our main concern here...)
The proportions are as follows:

1/3 Aloe Vera Gel

2/3 Alcohol (Isopropanol, Ethanol, etc)

5-10 drops of essential oil for fragrance (again, totally optional).


So in practice, that’s:


1/3 cup of gel mixed with 2/3 cup of alcohol, or if you’re working in ML, that’s 80ml gel mixed with 160ml of alcohol.

Mix it up and put it in an empty bottle, making sure it’s a tightly sealing lid as you don’t want the precious germ killing alcohol to leak out or evaporate!
Stay safe, people. Oh; and don’t be a prick - leave some hand soap and toilet roll for others please! 🙄

Friday, 11 October 2019

Cheesy Garlic Cream Mushrooms

https://drive.google.com/uc?export=view&id=1QoRzBVGb0yK0Go-qr1ogvJerTUPqTbRe
Ok... if you thought yesterday’s experiment was good, this will knock your socks off! I’m sat here in a food coma after diving face first into this pile of wonderfulness. 

Here’s how to make your own bowl of edible heaven:


Take a punnet of mushrooms and quarter them. Fry them in a good glug of Olive oil for a few minutes until they start to brown. Stir through a tbsp of butter and fry for another minute or two, then transfer them to an oven proof bowl, using a slotted spoon so that the water from the mushrooms (if any) is left behind. 


Drizzle with double cream, sprinkle with parsley and garlic powder and season with salt and pepper, before adding your cheese (I used sliced Gouda, Emmental & Red Leicester,  but you can use whatever). Whack the bowl into the oven for 6-8 mins, remove and dig in. Don’t forget to have a tissue on hand in case you start to cry like a little girl...

Honestly it’s THAT good.

Thursday, 10 October 2019

Cheesy Garlic Roasted Sprouts

https://drive.google.com/uc?export=view&id=1Wtszhmr9o3fONEeeNsAKba_e9NZOdcwn

Today’s experiment; creamy cheese garlic roasted sprouts! I just felt if I ate another egg today, I may start screaming and never stop... 
Here’s what I did, if you want to try it yourself:

Halve the sprouts and fry them in a pan with a good glug of olive oil, until they start to brown.

Add a few shakes of garlic powder and a knob of butter; stir to coat and then pour into an ovenproof bowl. Roast in the oven for 7-8 minutes, remove and season with salt & pepper. 

Drizzle with a little double cream, cover with cheese (I used sliced gouda and grated Red Leicester, but anything would probably work) then return to the oven for 5-6 minutes.

Empty the glorious bowl of bubbly lushness onto a plate and go at it like a whirling dervish... 

I’m so happy right now! **pats full tummy**

Tuesday, 24 September 2019

Thai Curried Haloumi & Spinach

https://drive.google.com/uc?export=view&id=14DW5c2PDavZI3LqEF3fs3zQ4w8q7sxLk

INGREDIENTS

3 tbsp Thai curry paste (I prefer green)

2-3 tbsp olive oil

1/2 block of halloumi

1 tbsp cumin seed
1 Bag of spinach

Onion powder

Garlic granules
Salt & Pepper to taste


METHOD


Put the oil into a small pan to warm, then add the curry paste. Slice the halloumi into cubes and add them to the pan, stirring to coat. Cook for 6-8 minutes or until the cheese looks like it’s going to melt.


In a separate pan, gently toast the cumin seeds; once you can smell the flavour being released, add a drop of oil and then the spinach.


Once the spinach has wilted down, it is cooked; season with a few shakes of garlic granules and onion powder, then salt and pepper to taste - bearing in mind that the haloumi is already salty! Plate up the spinach and top with the curried cheese. And that’s it! 

Wednesday, 11 September 2019

Keto New York Cheesecake

https://drive.google.com/uc?export=view&id=1C1weSj_4ay7DOxeYhzk75BpMfeyE3Y08

This is a keto friendly version of a classic baked cheesecake, without the base. If you are not doing strict keto, or have allotted some of your carbohydrate allowance just for this, feel free to make your cheesecake base first, then use this recipe to top it! (as you can see, that is what I have done).

Ingredients
675g cream cheese (softened)

5 tbsp unsalted butter (softened)

1 cup powdered Erythritol

3 large eggs (room temperature)

150ml sour cream (room temperature)

zest of 1 lemon

1 1/2 tsp vanilla extract


Instructions

Preheat the oven to 150c. Take a 9-inch springform pan and line with greased parchment. Wrap the pan with aluminium foil covering the bottom and up the sides, making sure at least one layer completely covers from one side to the other as it needs to watertight. 


In a large bowl, beat together the cream cheese and butter until smooth, then add the erythritol and combine. One at a time, beat in the eggs, making sure each one is fully mixed in before moving to the next.


Add the sour cream, vanilla extract and lemon zest, then beat again until the all the ingredients are well combined and the mixture is smooth. Pour into the pan and smooth over for a nice finish.

Place the pan inside a large roasting tray that has sides high enough to hold water half way up the cheesecake tin. Pour boiling water into the tray so that it covers the bottom half of the tin, set it in the oven and bake for 80 minutes.


Once removed from the oven, allow to cool to room temperature. Take a sharp knife and run it around the edge of the cake to loosen it from the pan then release the sides of the springform. 
Refrigerate for 4 hours before serving, if you can wait that long!

Saturday, 7 September 2019

It’s all in the jeans...

https://drive.google.com/uc?export=view&id=16ZTrvJeU3zvUYAiPbexcUbZkYX6Bmb03

I have been wearing the same pair of jeans over and over again for a year. I know. And this is AFTER buying a new pair! I was dieting when I bought the replacements so I bought the same jeans, just a size down. Since then I have simply not been able to get into them! I told myself at the time: “I won’t buy anymore size 12s as I intend to be a 10...” and so, here I’ve been, stuck in perpetual single jean hell; washing and wearing... washing and wearing. As you can see, they’ve badly faded and I’ve all but worn the crotch out, still refusing to give in. A few weeks ago I decided it’s never going to happen and was planning to wave the white flag - go buy some more 12s and be bloody-well done with it, but then I started keto as a last, desperate attempt. Guess who got into her new jeans today? 

That’s right... I’m in ‘em!! Take that fat tummy, you’re on your way out at last! 

Thursday, 5 September 2019

Coconut & Chilli cauliflower rice.

https://drive.google.com/uc?export=view&id=1nCVdwx0bbc02bbifC8S-cp0LZedRjtKM
INGREDIENTS:
1/2 large cauliflower

Handful of kale (chopped)

Handful of spinach (chopped) 

10 baby plum tomatoes (chopped)

1 large red chilli (chopped)

1tbsp butter or ghee

1/2 tbsp chilli oil

1tbsp coconut oil

2tsp Garlic powder

1tsp onion powder

1tsp stock powder


METHOD:
Grate the cauliflower to make your rice.


Melt the butter in a large pan with the chilli oil, add the rice and give it a good stir to coat; let it cook for a few minutes to soften.


Add the coconut oil, allow it to melt if solid, then stir in the remaining ingredients and cook through. 


Season with Himalayan pink salt.


Kat’s Italian inspired zoodles.

https://drive.google.com/uc?export=view&id=1_Qnxag6TILYDTZGn1b0Mm8THFEmEPrku
INGREDIENTS:
2 medium zucchini
150g mushrooms
handful of spinach
a good glug of olive oil (I use chilli infused)
100g mascarpone
1-2 tbsp green pesto (as you prefer)
salt & pepper (to taste)
sriracha (optional)


METHOD:
Top and tail the zucchini, then chop into zoodles. You can also slice them like ribbons with a peeler or mandolin; whatever floats your boat.


Into a large pan, add the oil and zoodles and let them fry over a medium heat. While you’re sweating off the liquid, chop your mushrooms and thinly slice your spinach. 


Once the excess moisture has left the zucchini and they start to brown, add the mushrooms, spinach and garlic powder, then season with salt and pepper. 


Once the mushrooms are sufficiently cooked, add in the mascarpone and pesto, then stir until the sauce has warmed through and the zoodles are coated thoroughly.


Slam onto a plate (if you haven’t already eaten them out of the pan) and season if required. I like to drizzle mine with sriracha, but it tastes equally good without... I just love chilli. If you do this, be mindful of the carb content of your sriracha sauce as it does have a small amount of sugar in it.
https://drive.google.com/uc?export=view&id=1k_65awl6yQHiRWSpBpyveo8NyegDdv2V


KETO-NOMS! 

Wednesday, 4 September 2019

90 Second Keto Bread

https://drive.google.com/uc?export=view&id=1LNKmmjRaFyzqyJfaJQhv9cUmUP3muDly

Today, I made keto bread! I’m sure most of you seasoned keto-ers already know about the 90 second bread recipe, but it was news to me! 😍 Cheese and coleslaw butty for tea. Magic 💫


For fellow newbs, here’s what to do:


Ingredients:

1 egg

1 tbsp oil/butter (I used chilli oil!)

3 tbsp ground almonds

1/2 tsp baking powder


Method:

Mix all the ingredients and pour into a little microwaveable bowl (grease it first). Put it in the microwave for 90 seconds and that’s it! slice it across the middle, stuff with goodies and chomp. 😎

Wednesday, 4 October 2017

Pizza Style Portobello Mushroom Recipe

On my quest for low-carb meals, I've just knocked up these bad boys - pizza style portobello mushrooms! 

Here's the recipe; you won't be dissapointed by their awesomeness.

INGREDIENTS:
4 Large Portobella Mushroom Caps
100g Pizza Sauce
1 large Mozzarella ball (sliced)
4-5 Cherry Tomatoes (sliced)
Basil leaves (torn)
Oregano
Garlic salt
Black pepper

Preheat your oven to 180 degrees.

Take out each mushroom stem, chop it up and then put it back into the cap.


Add a dollop of pizza sauce to each mushroom. 


Slice the mozzarella ball and place it on the top, then finish with the sliced tomatoes, some torn basil leaves and a good shake of garlic salt, oregano and black pepper.


Put the mushrooms on a wire rack and place in the oven for 20 minutes.

Voila! Nommy nommy low-carb goodness.


Thursday, 6 July 2017

Chinese Hot & Sour Soup Recipe

HOT & SOUR SOUP

Over 15 years ago, I was sat in a Chinese restaurant in Benidorm which served "Hot & Sour Soup" - I have tried it many times since, but it's never been the same. Well today, I finally managed to replicate it... I am in heaven! 😍
Here's how to make a batch of this gorgeous stuff for yourself...


INGREDIENTS:
2tsp peanut oil
70g mushrooms (sliced)
2 cloves garlic (minced)
1 tbsp ginger (minced)
1.2 litres vegetable stock
60ml rice vinegar
3tbsp soy sauce
1tbsp chilli garlic paste
1 tsp agave (or any liquid sweetener -  
       1tsp honey works)
1 tsp cornstarch
2 tsp water
1 head of pak choi
4 spring onions + extra for sprinkling 
1 tbsp toasted sesame oil
Black pepper
2 eggs (beaten)
Chilli oil

METHOD:
Heat the oil in a large pot. Add the mushrooms and sauté for two minutes.

Add the garlic and ginger and cook for about another minute stirring constantly.

Add the stock, vinegar, soy sauce, chilli-garlic paste and agave, and bring to a gentle simmer. 

Stir in the pak choi, spring onions, sesame oil and some pepper, then simmer for another few minutes to let the flavours mix.

Combine the cornstarch and water in a separate bowl until there are no lumps. Slowly add this to the simmering pot, stirring well until it starts to thicken, about 3 to 4 minutes.

Beat the egg in a small bowl or cup and then, in a fine stream, pour it into the soup. Stir soup several times.

Serve in bowls, sprinkled with extra spring onions and drizzled with chilli oil. 

Friday, 30 June 2017

Kat's Ratatouille


Worthy of Remy the rat himself, here is my recipe for a delicious ratatouille, without those horrid aubergines...

If you would prefer a more authentic version, drop the peppers and add sliced aubergine; though personally, I think the peppers add a sweetness which makes it way better!

INGREDIENTS:

- 500ml Passata (garlic & herbs)
- 6 large tomatoes
- 3 peppers
- 2 large onions
- 2 large courgettes
- 100g Parmesan/grated Italian hard cheese
- Olive oil

METHOD:

Pre-heat the oven to 200° (180° fan). 

Take a large baking dish and pour the passata into the bottom. 

Slice the veg and put it into the dish in rows, alternating the slices to make it look pretty.

Sprinkle with 50g of the cheese, cover with foil and whack it into the oven. 

After an hour, take it out and remove the foil.

Brush the top with olive oil, sprinkle on the remaining cheese and put it back into the oven for another half an hour. 

Serve however you like; I dish it up in bowls with big chunks of buttered farmhouse bread on the side. 

NOMTASTIC!!! x

Friday, 16 September 2016

Friendship

There are days when I mourn the friend I never truly had;
Though they are now few and farther between, for which I am grateful.
Pay mind to who you trust with your heart and the words with which they can break it;
Strive not to collect relationships as though their number be a measure of your worth. 
Treasure the friend who proves faithful to the last. It only takes one for you to feel truly blessed indeed.

~ Kat Thorpe  16/09/2016

Wednesday, 20 July 2016

Pokémon Go...

...just because. 😹

Saturday, 4 June 2016

Rescue Bird Nests

Making little nests for rescue birds is a great way of using up scrap yarn and helping creatures in need at the same time! They only take 10-15 minutes to make, so that lovely feeling of gratification you get when you finish a project could be yours many times a day...

**Please note, this pattern is written using UK abbreviations**

YOU WILL NEED: 
A 5mm hook & Chunky yarn. If you want to use up scrap yarn in other sizes, just hold two or three strands together, depending on what weight of yarn you are using. What you are aiming for is a tight stitch that keeps the nest upright and stops it being floppy.

METHOD:
Round 1) You can either begin with the magic loop method, in which case, do 10 htc into the magic loop, or:
ch 2, do 10 htc into the second ch from hook, join with a sl-st.
Round 2) ch 1, 2htc in each st around, join with a sl-st - 20
Round 3) ch 1, *htc 1, 2htc in next* around, join with a sl-st. - 30
Round 4-5) htc 2 rounds.
Round 6-7 ) dc 2 rounds.

Sew in ends.
So simple and rewarding, what are you waiting for? 👍🏻❤️😊

Thursday, 2 June 2016

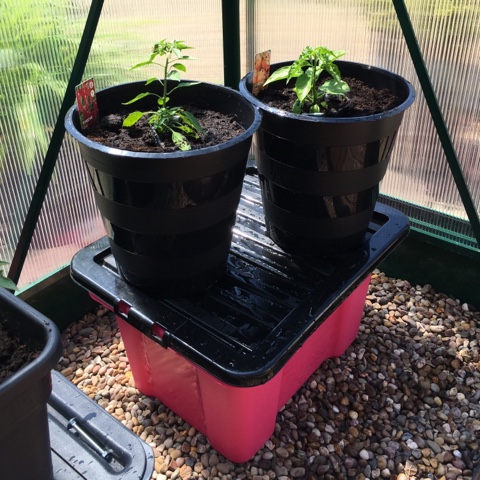
Easy DIY Self-watering System


After planting up my tomatoes in a "Quadgrow" system, I realised just how easy one of these things should be to make and save myself the best part of 40 quid in the process! So, without further ado, this is what I did...

I got a storage crate with a lid and drilled two 30mm diameter holes in the top:


did two because that's how many of the buckets I plant in that I could fit on top of the crate lid; you can obviously drill holes for however many plant pots that you can fit on. Then I drilled the same size holes into the bottom of the buckets.

Next you will need a piece of capillary matting for each pot. Cut this to a length that will reach from the base of your plant, down through the pot and into the crate, reaching the bottom. 

Slice a bit off the bottom section like so:


Thread a piece of matting, pointy end first, down through the hole in the pot and poke it out of the bottom:


It needs to come up through the pot high enough to wrap around the plant that you are going to be putting in.

Next, fill the pot with soil to the level that you are going to add to your plant, leaving the capillary matting poking out like this:


Add the plant and wrap the capillary matting around its soil and roots: 


Then top up the rest of the pot with soil:


Fill your storage crate with water and place the lid on top. Place your pot onto the lid and line up the hole in the pot with the hole in the crate. Feed the capillary matting down through the hole in the crate lid, making sure that the matting goes down into the water:  


Repeat these steps for the other pot (or for however many pots you are going to do) then water around the base of the plant, just to get the matting damp and started off.


And that is it! The roots will grow in and around the matting and the capillary action will continue to keep the plants supplied with water, just so long as you remembering to top up the water tank now and again...

NOTE: if you wish to add a fertiliser to the water, I suggest you empty the tank before you do so. If you keep topping up with water, then with fertiliser etc, your ratios will be all over the place and you could end up over/under feeding. Emptying the tank and starting again with a fresh mix, will avoid this problem.


Now you can go away for the weekend and not have to pester your relatives or neighbours to water your plants!

Happy growing :-) x 

Monday, 1 June 2015

Coz it's the Pick of Destiny, Child!


My husband and I are converting the attic bedroom into a recording studio and are hoping to fill the walls with fun stuff - ideally things that are homemade. Rob had an idea about one of those fire alarm emergency panels that you have to break the glass to access the button, only ours should have a plectrum in it for emergencies! Not only did this amuse me greatly, it also gave me an idea.

Enter the 'Pick of destiny.' With such an awesome power, it would be foolish to use it willy nilly, but it's the perfect choice in an emergency situation!

To misquote the devil himself, check this pic it's fucking tasty!


I sculpted the pick out of polymer clay and now it sits in it's box on the wall, patiently waiting until such time that Rob needs to bring the thunder. 


Wednesday, 14 January 2015

Vegetarian Cottage Pie Recipe


I am currently in a food coma after scoffing down half of an enormous cottage pie; I would have tried to squeeze in the rest (it was so good) - but my husband took care of that, thankfully! I love finding vegetarian versions of old classics, especially when it is a dish that I never really enjoyed because of the taste/texture of the meat used. It's quick and easy, especially if you cheat with the mash topping; I use ready-made, just to speed up the process.

Ingredients:
  • For the mash (if you are not cheating):
  • 600g potatoes
  • 250g swede
  • 250g carrots

For the filling:
  • 1 tsp vegetable oil
  • 1 medium onion chopped
  • 2 carrots (chopped small)
  • 1 courgette (grated)
  • 2 garlic cloves (chopped fine)
  • 300g vegetarian mince
  • 100g mushrooms sliced
  • 400g chopped tomatoes (1 tin)
  • 50ml water
  • 2 vegetable stock pots/cubes
  • 2 tsp curry powder
  • 2 tsp cornflour
  • Salt & pepper to season
  • Small handful of cheddar 
Method:

1. For the mash, cook the potatoes, carrots and swede  in a large saucepan of boiling water until tender - (approx 20 minutes.)

2. Heat the oil in a large pan and fry the onion, garlic and carrots for a few minutes, until softened. Stir the curry powder through, then add the vegetarian mince, tinned tomatoes, stock pots/cubes, water, mushrooms and grated courgette. Bring the mixture to the boil, then lower the heat and simmer for 20 minutes. Taste and season to your liking with salt & pepper.

3. Warm a large baking dish underneath the grill whilst mashing the carrots, swede and potatoes.

4. Blend the cornflour with 1 tbsp cold water and use it to thicken the filling. Pour the mixture into the baking dish and spoon the vegetable mash on top. Sprinkle with a bit of cheddar and grill for about 8-10 minutes. Now stuff your face, trying to stop before you explode!


You are welcome.


Wednesday, 17 December 2014

Merry Christmas everyone & please consider donating :)

If there is anyone out there who would like to do a kind thing for me this year, please consider making a donation to Caerphilly Bird Rescue. This was the year I finally became a vegetarian; I've never been comfortable putting one form of life above another - we are ALL AMAZING - from the most influential human to a tiny spider and absolutely no one is more deserving of kind treatment or consideration than anyone or anything else. 

Changing my diet has been a life improving experience; I genuinely have peace in my soul. Now I spend my time trying to help animals in other ways too, and the work they do at CBR is nothing short of heroic; rescuing injured birds and nursing them back to health. 

So if you are planning on donating this Christmas period, I urge you to give them a gift, however small. Their website has a donate button: http://www.caerphillybirdrescue.com

Here's wishing you all a fabulous festive season and new year. Peace and love xxx

Tuesday, 28 October 2014

Winter in a bowl - Spicy Parsnip Soup


Now that the weather has turned colder, it is time for me to enjoy the soup making part of the year! I asked my husband if he had any requests and he said he'd really like me to try a spicy parsnip soup. I trawled the usual websites and picked Gordon Ramsay's version for my first attempt. I'll tell you now, I will not be looking any further! This soup is to die for. As Gregg Wallace would say, "I could shove my whole face in it."

For those of you that would like to have a go at this divine soup, I found the recipe here, on 'Farmersgirl Kitchen' blog: