chilekat's latest photos on Grows on You, where garden ideas are shared.

Saturday, 12 February 2011

LOL Cats :-)

Surely everyone has seen a LOL Cat picture or two by now...
Well, love them or hate them; I don't think they are going away any time soon! Personally, I think they are brill and I was ever so grateful to my kitty today when he offered me a photo opportunity just right to make a Lol Cat picture of my very own:

Photobucket

Thank you, Mr Wilson xx

Making Music Again :-)

Rob and I are finally getting around to making music again after having made our back room into a bit of a studio! The plan is to get gigging again so it's back to the practicing stage for us, though we are also recording at the same time and it's great fun; It's nice to be getting a feeling of accomplishment again!

This is the first track we've finished, it's not bad quality for being recorded in what is effectively a study.

Thursday, 13 January 2011

Loops, loops everywhere!! :-)

Today's visit to the propagator found loops popping up all over the place!

As a consequence, the prop has now been moved under the lights - no leggy seedlings in this house if you please......


So the scores on the doors so far:

Orange Hab - (loved them last season and still have a freezer full!) 0/2
Peruvian White Hab 1/2
Yellow Pointed Hab 2/2 (Possibly not if this is a rogue seed!)
Chocolate Hab 0/2
Fatalii 0/2
Yellow Scorpion 0/2
Jamaican Red Hot 0/2
Jamaican Mini Bonnet 0/2
7 Pot White 0/2
7 Pot Brain 1/2
Dorset Naga 0/2
Bhut Jolokia 0/2
Bonda Ma Jackques 0/2
Turbo Pube 0/2
Cili Goronong Yellow 0/2
Bulgarian Carrot 1/1
CAP 253 C 0/2
Black Scorpion Tongue 1/2
SuperChilli 0/2
Limo 2/2
Baby Sweet 1/2

Not a bad start at all! :-)

Tuesday, 11 January 2011

Kat's "Two-Sticks" Easy Cable Hat

Well, I've knitted so many of the "Two-Sticks" Ear-Flat hats, I decided it was time I moved on a little! I've always feared cabling, but discovered it can be really easy and I've made a pattern that gives a really nice continuous design around the hat. Again, this hat is knit up on two needles, no circulars required :-)

Where I have put "C6F" all you have to do is slip the next 3 stitches onto a spare needle and hold them forward (to the front of the work) then knit the 3 stitches that follow those. Once you've done that, knit the 3 from the spare needle so in effect, they are crossing over the previous stitches.

ABBREVIATIONS:
K = knit
P = purl
K2tog = knit 2 together
P2tog = Purl 2 together
RS = right side
WS = wrong side
St-St = Stockinette
sts = stitch(es)

YOU WILL NEED:
5mm Needles.
Chunky yarn in whatever 2 colours you would like. I used a variegated yarn for my main colour so the finished hat has more colours in it.

METHOD:
Cast on 98 sts in the colour you'd like for the band.
ROW 1: (K2, P2) to end
ROW 2: (P2, K2) to end
ROW 3: (K2, P2) to end
Row 4: (P2, K2) to end

Continue in established pattern until you have 20 rows, ending on a WS row.
Changing to the main colour and St-St 2 rows.
Now it's time to start the cabling.

CABLE PATTERN:
ROW 1: K1, (K2, C6F, K2, P2, K2, P2) 6 times, K1
ROW 2: P1, (K2, P2, K2, P10) 6 times, P1
ROW 3: K1, (K10, P2, K2, P2) 6 times, K1
ROW 4: P1, (K2, P2, K2, P10) 6 times, P1

Repeat the above 4 rows another 3 times.
Knit Row 1 & 2 once more.

REDUCE FOR TOP
Now it's time to start reducing for the top of the hat.
K1, (K10, K2tog) 8 times, K1 - 90
Purl Row
K7, K2tog to end - 80
Purl Row
K6, K2tog to end - 70
Purl Row
K5, K2tog to end - 60
Purl Row
K4, K2tog to end - 50
Purl Row
K3, K2tog to end - 40
Purl Row
K2, K2tog to end - 30
Purl Row
K1, K2tog to end - 20
Purl Row
K2tog to end - 10
P2 tog to end - 5

Cut the yarn, leaving a good length tail; enough to sew down the seam. Thread the tail through remaining sts and pull tightly together to secure.
Sew down the row ends (using mattress stitch if you can, but not essential).

Sew in any ends (or worms as my other half likes to call them) and you are finished!
If you'd like, you can add something like a button or a knitted flower - Put the finished hat on your head, position the accessory in front of a mirror so it is where you like it and then sew it down; preferably, take it off your head first or your accessory may be a tad more permanent than you'd like!

You should end up with something like these lovely hats:

Monday, 10 January 2011

It's germination time again!

I can't believe it! It's come around already and, (pardon the cliche) it seems like only yesterday I was nervously popping seeds into soil for the first time...

But here we are, once again; and without further ado, let me introduce you to this year's brood (Planted on 5 Jan):

Burried in there we have the following varieties:

Orange Habanero - (I loved them last season and still have a freezer full!)
Peruvian White Habanero
Yellow Pointed Habanero
Chocolate Habanero
Fatalii
Yellow Scorpion
Jamaican Red Hot
Jamaican Mini Bonnet
7 Pot White
7 Pot Brain
Dorset Naga
Bhut Jolokia
Bonda Ma Jackques
Turbo Pube
Cili Goronong Yellow
Bulgarian Carrot
CAP 253 C
Black Scorpion Tongue
SuperChilli
Limo
Baby Sweet

And if that wasn't enough to be getting on with, I still have my purple Bonsai and a Chocolate Jolokia Bhut clone - otherwise known as the "Turd Plant" (Thanks Dave!)

I made the bonsai from a C. Chinense/C.Annuum Cross. It's my first bonsai and I have to say it is doing wonderfully and it's so pretty:

It also has buds, though I assume it's very early for them to turn into pods.... we shall see!

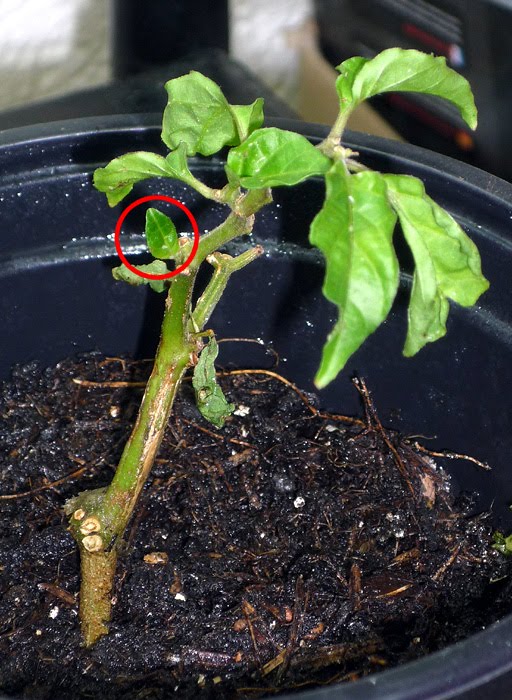
The Chocolate Jolokia Bhut clone was sent to me by a friend called Dave who I know through a chilli grower's forum - It is also looking healthy.

Though not much was happening in terms of growth, I took the lack of wilt or signs of turning brown to mean that it was surviving; now it has just begun to grow a new leaf - happy confirmation that we are A-OK! (New leaf circled):

So all in all, a good start; what we want now is for some seedlings to sprout!
I shall update when they start to break through :-)

Chilli

Thursday, 2 December 2010

DR WHO Style Fingerless Gloves

I recently knitted 2 Dr Who Scarves; one for a dear friend called Phill who now lives in Canada and mini version for Rob, aka him indoors :-)
It seemed only right to design a pattern for matching gloves, so here it is and here's what they look like:

The pattern is as follows:

YOU WILL NEED:

3mm needles and DK wool in the following colours: GREEN, YELLOW, RED, PURPLE, GREY, TAN & BROWN.

METHOD:

Cast on 46 sts

Using your first colour, K1 P1 Rib for 10 rows, then change colour and St-St 38 rows, making sure to change colours to get your stripes - I did: 8 Yellow, 6 Red, 4 Purple, 10 grey, 4 tan, 8 brown. Then K2 P2 rib for 30 rows, I did this in the green. You can do the stripes whatever thickness and in whatever order you like. Just keep in mind that the first rib is 10 rows, the finishing off rib is 30 rows and the st-st in the middle is 38 rows of whatever you like. Cast off loosely, (I use a larger needle) this helps keep the glove entrance wide enough to push your hand through.

MAKING UP:

sew up the seam from both the bottom and top, leaving a hole for your thumb to go through - that's it! Simple ;-)


Rob loves 'em!